

Crossing a fence without a gate
Climbing fences is a bad habit - it damages or weakens them a little bit every time and will eventually compromise the integrity of the fenceline. There's also a chance you'll hurt yourself in the process, more so the older you get. And if there's a hotwire on the fence you'll probably get a good wallop from that as well.
A gate is probably the easiest way to get from one side of a fence to the other, and it's certainly the only practical way I can think of to get livestock from one side of a fence to the other. But there are times you want an easy way for humans to hop over a fence, without the expense of adding a gate. There's the cost of a gate, gate gudgeons, 2 strainers, and stays … it really starts to add up.
Sometimes a gateway might be a long walk out of your way, or you need a shortcut to double around behind some cattle or sheep you want to move.
If you aren't looking for a wheelchair-friendly option, then a simple and cheap solution is a traditional stile.
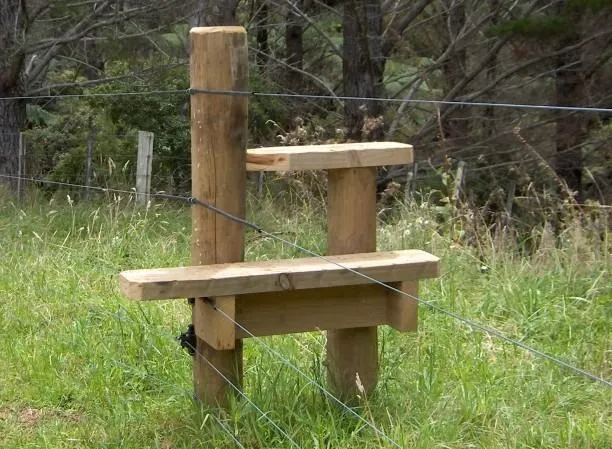
Stiles can be added to an existing fenceline - whether it's wire and batten, post & wire, permanent electric, sheep netting, post & rail (mind you they're almost readymade stepladders), you can even add a stile to stone walls. This article is about a simple stile for a post & wire fence.
Some stile designs are based on two steps on each side of the fence - effectively cutting fence height to a third and making it an easy climb up and down. We've added 7 or 8 stiles around our property and gone with a one-step design - all our internal fences are 4 wire, 1050mm high, and running 2 hot wires with enough voltage to make you walk funny if you touch them. A single step stile halves that height making it a step over rather than a climb up and down. For added protection against getting zapped by the hotwires we've sleeved them in insulated tubing where they pass through the stile.
The beauty of this stile design is that it's easily prefabbed out of H3 treated rough sawn 150 x 50 timber - and you'll usually be able to find offcuts to suit any post & rail or retaining wall jobs you've done. It attaches easily to an existing fence post. A second (shorter) fence post is set back 200-300mm from the fence line as a brace or anchor for the step. This second post can be hand dug into place - 500mm deep is usually fine for most soil types. The stile is made up of 5 pieces of 150x50 timber and is attached to both posts with a combination of 100x4.0mm and 125x5.3mm flat head galvanised nails.

Construction is simple:
Dig in brace post at right angles to fenceline - 200-300mm behind your selected fencepost
Nail sides to bearer, then nail bearer to fencepost & brace post (using 125mm flat head nails). Use a spirit level to set dead horizontal - remember to set the bearer 50mm lower to allow for the thickness of the step board.
Nail step onto bearer (hard up against both posts with one end projecting through the fence as a step by approx 150-250mm) - use 100mm flat head galv nails to secure well to bearer.
Fit brace - trim end of brace board that fits fence line post to a taper - mark fencepost and chisel a notch 20-30mm deep into the post to receive the tapered end of the brace. Fit brace into a notch, skew nail with a 100mm galv nail, and skew nail the brace board to the brace post with 3 or 4 125mm flat head galv nails.
Use a rasp or plane to take any sharp edges off the finished stile.
If the stile is going in a damp or shady area, a bit of chook wire tacked onto the step board with 30mm staples will deal with the slippery step problems.
Timber required (all 150x50mm):
Rough-sawn timber is best because it isn't so slippery underfoot.
Step - 800 - 900mm long
Step bearer - 550mm long
Brace board - 450mm long - notch into fencepost with a chisel
Bearer sides - 1 @ 95mm long (at the brace post end), 1 @ 210mm long (160mm long + 50mm for the 45 degree bevel) - (at the fence post end)
Tools required:
Handsaw or circular saw
Set square & tape measure
Hammer & 100mm + 125mm flat head galv nails.
Spirit level
Spade/hand rammer, hole digging equipment
Rasp or plane
Click here to download a PDF of step by step instructions (with photos!)
More resources:
"Before You Start Fencing" is a practical, downloadable ebook packed with a lifetime of experience, offering essential tips and advice to help you plan and manage fencing projects with confidence.